
Your dishwasher’s heating element plays a crucial role in ensuring that your dishes come out sparkling clean and sanitized. However, when this essential component malfunctions, it can lead to ineffective wash cycles and even cause long-term damage to your appliance. Understanding how to test a dishwasher heating element is a valuable skill for any DIY enthusiast, as it empowers you to diagnose issues early and potentially saving you from costly repairs or replacements. In this comprehensive guide, we will walk you through the step-by-step process of testing your dishwasher’s heating element. Whether you’re experiencing issues or simply want to perform routine maintenance, this guide will equip you with the knowledge and tools needed to assess the health of your dishwasher’s heating element accurately.
How to test a dishwasher heating element
There are some steps that you must know to be familiar with how to test a dishwasher heating element:
Step 1: Safety First
Before you embark on testing your dishwasher’s heating element, safety should be your top priority. Start by turning off the dishwasher and unplugging it from the power source. This simple step ensures that you can work on the appliance without any risk of electric shock.
Step 2: Accessing the Heating Element
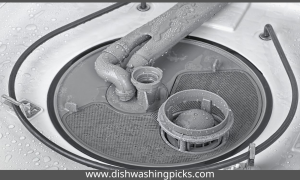
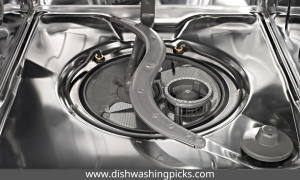
Locate the heating element in your dishwasher. It’s often found at the bottom of the tub or near the lower spray arm. If you’re unsure, consult your dishwasher’s manual for guidance. Once located, you may need to remove the lower dish rack or access panel to get a clear view of the heating element.
Step 3: Gather Your Tools
To test the heating element, you’ll need a multimeter. This versatile tool allows you to measure electrical resistance, providing insights into the health of the component. Make sure you have the multimeter on hand before proceeding.
Step 4: Set Up the Multimeter
Set your multimeter to the ohms setting. This is the resistance measurement, which is crucial for testing the heating element. If your multimeter has an audible continuity feature, enable it — this will make the testing process even more straightforward.
Step 5: Testing for Continuity
With the multimeter ready, touch the probes to the terminals of the heating element. If the multimeter displays a reading within the expected range or emits a continuous beep, it indicates that the heating element has continuity and is in good working condition.
Step 6: Interpreting the Results
If the multimeter shows no continuity or a significantly high resistance reading, it suggests a problem with the heating element. This could be due to a break in the circuit, signaling the need for further inspection or replacement.
Best drinking glasses for dishwasher (Best 7 suggestions)
Step 7: Seek Professional Help if Needed
If you’re uncomfortable with the results or encounter any difficulties during the testing process, it’s perfectly okay to seek professional assistance. Sometimes, electrical issues can be complex, and a trained technician can provide accurate diagnostics and solutions.
By following these steps, you empower yourself to assess the health of your dishwasher’s heating element. Regular testing and maintenance ensure that your dishwasher continues to operate efficiently, saving you both time and money in the long run.
Tools and Materials Needed
Now that you’re ready to embark on the journey of testing your dishwasher’s heating element, let’s ensure you have all the necessary tools and materials on hand. This step is essential for a smooth and efficient testing process. Here’s what you’ll need:
Multimeter
This trusty device is your go-to tool for measuring electrical resistance. If you don’t already have one, consider investing.
Screwdriver
Depending on your dishwasher model, you may need a screwdriver to remove the lower dish rack or access panel. A Phillips or flat-head screwdriver should cover most scenarios.
Safety Gear
Prioritize your safety with a pair of insulated gloves and safety goggles. These will protect you from any accidental electric shocks and ensure a secure testing process.
User Manual
Keep your dishwasher’s user manual handy. It contains valuable information about the appliance’s components and can guide you to the location of the heating element.
Pen and Paper
Have a notepad and pen nearby to jot down any observations, readings, or model numbers. This documentation can be handy for reference if you need to seek professional advice later.
Flashlight
A small flashlight can be immensely helpful, especially if your dishwasher is in a dimly lit area. It ensures you have a clear view of the heating element and surrounding components.
Container or Towel
It’s always a good idea to have a small container or a towel on hand. In case you need to remove any water from the dishwasher during the process, you can do so without making a mess.
Patience and Curiosity
While not physical tools, these are equally important. Approach the testing process with patience, and let your curiosity guide you. A calm and inquisitive mindset can make troubleshooting more enjoyable and effective.
Assemble these tools and materials before starting the testing process. This ensures that you can focus on the task at hand without interruptions, creating an environment conducive to a successful dishwasher heating element assessment.
Remember, every tool has a role to play, and your thorough preparation sets the stage for a smooth testing experience.
Signs of a Faulty Dishwasher Heating Element
Understanding the signs that your dishwasher’s heating element may be on the fritz is crucial for maintaining the efficiency of your appliance. Keep an eye out for the following indicators:
Inadequate Drying
Imagine opening your dishwasher after a full cycle only to find damp dishes and lingering moisture. This is a tale many have experienced, and it often points to a struggling heating element. If your dishes consistently lack that dry sparkle, it’s time to investigate.
Extended Wash Cycle Times:
Picture this: your dishwasher seems to be stuck in a prolonged washing dance. If you notice your dishwasher taking much longer than usual to complete a cycle, it might be working overtime to compensate for a heating element that’s not pulling its weight.
Cold Water During Wash Cycle:
Envision standing by your dishwasher as it merrily hums along, only to realize that the water inside is more lukewarm than comfortably hot. This can be a subtle sign that your heating element isn’t kicking into high gear as it should.
Cloudy or Residue-Covered Dishes
Think about the disappointment of pulling out supposedly clean dishes, only to find a film of residue or cloudiness. A struggling heating element may not reach the temperatures needed for optimal detergent performance, leaving your dishes less than pristine.
Best drinking glasses for dishwasher (Best 7 suggestions)
Unpleasant Odors:
Close your eyes and imagine an unpleasant odor wafting from your dishwasher. A malfunctioning heating element can contribute to a damp environment inside the dishwasher, providing a breeding ground for unwanted smells.
Step-by-Step Assessment:
Now that you’ve identified potential signs of a faulty heating element, it’s time to embark on a step-by-step assessment. Stay tuned for the next sections of this guide, where we’ll delve into the tools needed and the process of testing your dishwasher’s heating element.
By recognizing these signs early on, you’re taking the first proactive steps toward maintaining the peak performance of your dishwasher.
Troubleshooting and Interpreting Results
So, you’ve identified potential issues with your dishwasher’s heating element, and now it’s time to roll up your sleeves and troubleshoot. Follow these practical steps to pinpoint the problem and interpret the results:
Step 1: Revisit the Symptoms
Imagine retracing your steps in a detective story. Go back to the signs we discussed earlier — inadequate drying, extended wash cycle times, and lukewarm water. Confirm if these symptoms align with your dishwasher’s behavior. This helps in narrowing down the potential issues.
Step 2: Visual Inspection
Take a closer look at the heating element. Check for any visible damage, discoloration, or debris. Sometimes, a simple visual inspection can reveal clues about the element’s condition.
Step 3: Inspect Wiring and Connections
Ensure that the wiring connected to the heating element is intact and securely connected. Loose or damaged wires can disrupt the flow of electricity and impact the element’s performance.
Step 4: Multimeter Testing:
Grab your trusty multimeter and set it to the ohms (Ω) setting. With the dishwasher disconnected from power, test the heating element for continuity. Touch the multimeter probes to the element’s terminals and observe the readings.
Step 5: Interpreting Results
Picture reading a map. If the multimeter shows continuity or a low resistance reading, it suggests that the heating element is functioning properly. However, if there’s no continuity or a high resistance reading, it indicates a potential issue that requires further attention.
Conclusion
Congratulations on successfully navigating the process of testing your dishwasher’s heating element! By now, you’ve embarked on a journey to troubleshoot and interpret the subtle signs that indicate a potential issue with this essential component. Whether you’ve confirmed the heating element’s health or identified a hiccup in its performance, your proactive approach is commendable.