Maintaining a clean and hygienic kitchen involves more than just wiping down countertops and scrubbing dishes. Often overlooked, the area behind your dishwasher can harbor unseen dirt and grime, impacting not only the appliance’s performance but also the overall cleanliness of your kitchen. In this guide, we will walk you through the step-by-step process of how to pull out a dishwasher to clean behind it. Discover the importance of this often neglected task and learn the essential steps to ensure a thorough and effective cleaning routine for a sparkling kitchen.
How to pull out a dishwasher to clean behind it
You must follow the following steps to learn many details about how to pull out a dishwasher to clean behind it:
Step 1: Power Down and Gather Your Tools
Begin by ensuring your safety and the smooth execution of the task. Turn off the dishwasher’s power supply at the circuit breaker. Once done, collect the tools you’ll need: a screwdriver, pliers, a wrench, and a towel.
Step 2: Disconnect the Power Cord
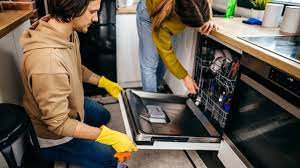
With your tools in hand, carefully pull the dishwasher away from the wall to access the power cord. Unplug it from the electrical outlet and, if applicable, detach any hardwired connections. Tuck the cord away to prevent any tripping hazards during the process.
Step 3: Cut Off the Water Supply
Locate the shut-off valve under the sink and turn it clockwise to shut off the water supply. If there’s a direct line to the dishwasher, use pliers to disconnect the water supply hose. Keep a towel handy to catch any residual water, and be prepared for a small amount to spill.
Step 4: Deal with the Drain Hose
Trace the dishwasher’s drain hose to where it connects to the garbage disposal or sink drain. Using pliers, carefully disconnect the hose. Have a small bucket or towel ready to catch any water that may drip out, These are among the steps on how to pull out a dishwasher to clean behind it.
Step 5: Loosen the Mounting Brackets
Most dishwashers are secured in place with mounting brackets. Locate these brackets on the top or sides of the appliance and use a screwdriver or wrench to loosen them. This step may vary depending on your dishwasher model, so consult your user manual if needed.
Step 6: Slide Out the Dishwasher
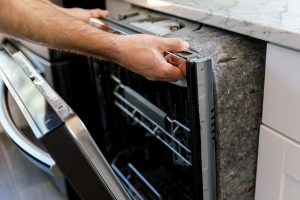
Once you’ve loosened the mounting brackets, gently slide the dishwasher away from the cabinet. Take your time to avoid damaging the flooring or any surrounding appliances.
If the dishwasher feels stuck, double-check for any remaining connections or obstructions.
These are among the steps on how to pull out a dishwasher to clean behind it the back following these steps; you’ll successfully pull out your dishwasher, setting the stage for a thorough cleaning of the often-neglected space behind it.
This not only ensures a more hygienic kitchen but also contributes to the longevity and optimal performance of your appliance.
Cleaning Behind the Dishwasher
After we learned the steps on how to pull out a dishwasher to clean behind it, we began to prepare the washing machine to start cleaning:
Step 1: Clear the Space
Before diving into the cleaning process, take a moment to clear the area around and behind the dishwasher. Sweep away any loose debris and remove items that might obstruct your access.
Step 2: Inspect for Obstacles
While you’re clearing the space, keep an eye out for any unexpected obstacles or potential hazards. It’s always better to address these before you start cleaning.
Step 3: Remove Accumulated Dirt and Debris
With the dishwasher now pulled out, use a vacuum cleaner or a handheld brush to remove accumulated dirt, dust, and debris. Pay special attention to the corners and edges where grime tends to accumulate.
Just like dusting off an old book, clearing away the debris feels like giving your kitchen a fresh start. Picture it as revealing the hidden chapters behind your dishwasher.
Step 4: Wipe Down Surfaces with a Damp Cloth
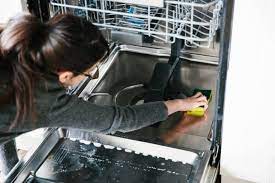
Dampen a cloth with a mild cleaning solution or a mixture of water and vinegar. Wipe down the walls and floor behind the dishwasher, ensuring you reach every nook and cranny. This helps eliminate grease and any lingering odors.
Imagine this as a mini-cleansing ritual for your kitchen – a gesture that not only refreshes the physical space but also revitalizes the atmosphere where family meals and gatherings happen.
Step 5: Clean the Floor Beneath the Dishwasher
Take a closer look at the floor beneath the dishwasher. Wipe it clean and check for any signs of water damage. If you spot any, it’s crucial to investigate the source to prevent future issues.
Think of this step as uncovering the floor’s secrets. It’s like peeling back layers to reveal a cleaner, healthier foundation for your kitchen.
Step 6: Inspect and Clean the Dishwasher’s Back Panel
Lastly, turn your attention to the back panel of the dishwasher. Gently clean it with a damp cloth to remove any dust or grime. If you notice any visible dust buildup on the coils or vents, use a soft brush or vacuum attachment to clear it away.
This is akin to giving your dishwasher a spa day and pampering it with a little extra attention to ensure it continues to run smoothly.
By following these steps, you’re not just cleaning behind the dishwasher; you’re nurturing a space that plays a central role in your home’s daily rhythm. This small act of care contributes to a healthier, more pleasant kitchen environment for you and your loved ones.
Gather the necessary tools and materials
First, you need to prepare some of the following tools:
Step 1: Understand the Importance
Before you roll up your sleeves, take a moment to understand why pulling out your dishwasher for cleaning is more than just a chore. Picture your kitchen as a storybook – each chapter filled with memories and shared meals.
Cleaning behind the dishwasher is like turning a page, revealing the hidden details that contribute to a cleaner, more hygienic setting.
Step 2: Gather Your Tools and Materials
Imagine preparing for a small DIY adventure. To embark on this cleaning journey, gather your trusty tools: a screwdriver, pliers, a wrench, and a towel. Having everything on hand ensures a smoother process, much like having a map before setting out on an exploration.
Step 3: Turn Off the Power and Water Supply
Now, for the safety chapter. Before unplugging anything, head to the circuit breaker and turn off the power to the dishwasher. Safety first, always.
Next, locate the shut-off valve under the sink and turn it clockwise to stop the water supply. This ensures a dry and secure environment as you begin.
Think of this step as ensuring your kitchen’s safety, like setting up a protective barrier before embarking on a journey. It’s about creating a secure space for your culinary adventures.
Step 4: Clear the Space Around the Dishwasher
Imagine preparing a stage for a performance. Clear the area around the dishwasher, creating a workspace for your cleaning act. Remove any items that might hinder your movements – it’s like setting the stage for a meticulous production.
Step 5: Prepare for Potential Surprises
As any good explorer knows, you might encounter unexpected twists on your journey. Take a moment to inspect the space and anticipate any surprises, like hidden connections or obstacles. This brief pause can save you from unnecessary detours during the task.
Step 6: Ready, Set, Go
Now that your tools are ready, the power is off, and the stage is set, it’s time to embark on this cleaning adventure. Picture yourself as the protagonist of your kitchen tale, taking the first steps toward a cleaner, healthier space.
With preparation complete, the next chapter unfolds as you pull out the dishwasher to reveal the hidden corners of your culinary haven.
Tips for a Thorough Cleaning
Follow these tips on how to pull out a dishwasher to clean behind it:
Step 1: Choose the Right Cleaning Solutions
Just like selecting the perfect ingredients for a recipe, choose cleaning solutions that suit your dishwasher’s surfaces.
Step 2: Pay Attention to Hidden Corners and Crevices
Imagine this as exploring the nooks and crannies of a well-loved bookstore. Use a toothbrush or a small, soft brush to get into the hidden corners and crevices of your dishwasher. This step ensures a thorough cleaning, leaving no story untold.
Step 3: Inspect and Clean Filters if Applicable
Just as you might sift through a collection of treasures, take a moment to inspect and clean your dishwasher’s filters if it has them. Rinse them under warm water to remove any accumulated debris.
Step 4: Check for Any Signs of Leaks or Damage
Consider this step as reading between the lines. While cleaning, keep an eye out for any signs of leaks or damage.
Step 5: A Final Check and a Smile
As you conclude your cleaning session, take a moment to appreciate the efforts. Picture it as the last chapter of a satisfying book..
Conclusion
After our article, incorporating these tips on how to pull out a dishwasher to clean behind it: into your dishwasher cleaning routine, not only ensures a practical approach but infuses a sense of care into your kitchen story. It’s the small details, the hidden corners, and the preventive measures that make your kitchen narrative a delightful and well-maintained tale.
