Embarking on the journey to connect your dishwasher drain hose to the sink is a commendable step towards a more efficient and enjoyable kitchen experience. In this step-by-step guide, we’ll walk you through the process, providing clear instructions and helpful tips to ensure a smooth connection. Whether you’re a seasoned DIY enthusiast or a first-time installer, mastering this fundamental task will not only enhance the performance of your dishwasher but also save you time and potential frustrations down the line. Let’s dive in and make connecting your dishwasher drain hose to the sink a straightforward and satisfying endeavor.
How to connect dishwasher drain hose to sink
There are some steps that you must follow in order to know how to connect the dishwasher drain hose to the sink:
Position Yourself for Success
Find a comfortable working position beneath the sink, armed with your tools and a clear mindset. This step is all about setting the stage for a smooth and stress-free connection.
Identify the Sink’s Drain Outlet
Locate the drain outlet underneath the sink. It’s usually situated at the back, patiently awaiting the company of your dishwasher drain hose. Clear any under-sink clutter for easy access.
Unravel and Straighten the Drain Hose
Take your dishwasher drain hose and give it some room to breathe. Unravel any twists or kinks, ensuring it’s a straight shot from the dishwasher to the sink. If the hose feels a bit stiff, a warm water soak can work wonders.
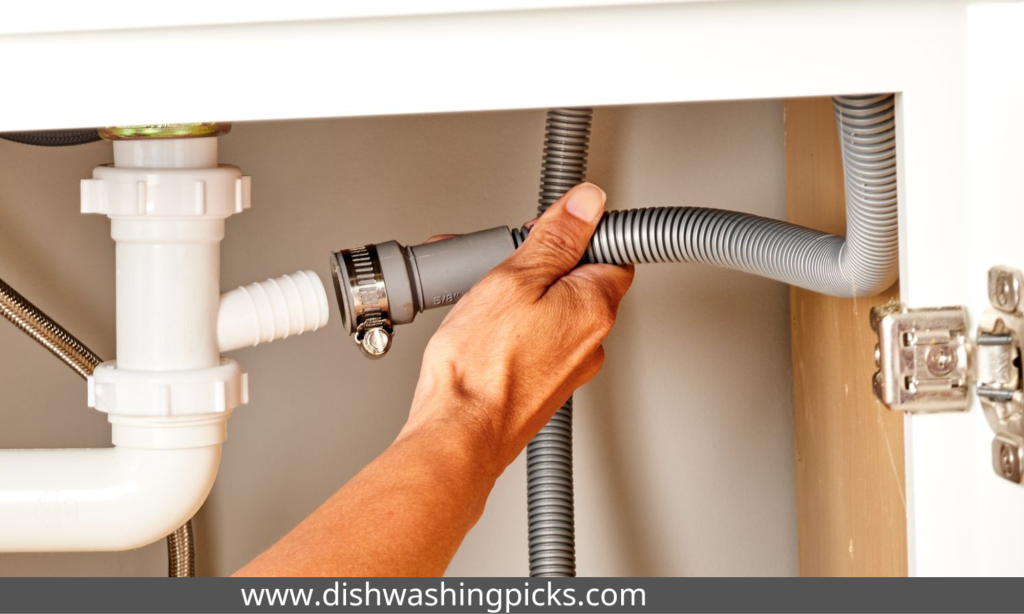
Firm Handshake – Attach the Hose to the Sink Drain
Gently slide one end of the drain hose onto the sink’s drain outlet. It’s like a firm handshake between two old friends. Make sure it’s snug, establishing a connection that will stand the test of time.
Seal the Deal with Clamps or Zip Ties
Introduce the unsung heroes of this connection – clamps or zip ties. These trusty companions ensure a secure bond. Place them around the connection point, tightening just enough to keep everything in place without squashing any dreams.
Picture the clamps or zip ties as the loyal friends at a party, ensuring everyone is safely connected and having a good time.
Give it a Gentle Tug
Test the connection with a gentle tug. It should feel secure, like a reassuring nod that everything is in place. This small yet crucial step adds an extra layer of confidence to your installation.
Congratulations! You’ve successfully attached one end of the dishwasher drain hose to the sink’s drain outlet. The connection is secure, and your kitchen is one step closer to the convenience of a fully operational dishwasher. Onward to the next step.
Best drinking glasses for dishwasher (Best 7 suggestions)
Instructions for
and preparing the drain hose
After we learned the details about how to connect dishwasher drain hose to sink, you can follow some instructions for that, which are as follows:
Unveil Your Dishwasher’s Secret Weapon
Before diving into the unraveling process, take a moment to appreciate the unsung hero of your dishwasher—the drain hose. It’s like a coiled spring, patiently waiting to unleash its magic.
Clear a Path to Unwind
Create a clutter-free zone around your dishwasher. Gently move any obstacles or unnecessary items, giving yourself and the drain hose some breathing room. This step is about setting the stage for a seamless unraveling experience.
Imagine the drain hose as a tightly wound scroll, holding the secrets to hassle-free dishwashing.
Free the Hose from Its Shackles
With a delicate touch, begin to unravel the drain hose. Picture it as unwrapping a gift, revealing the potential for efficient drainage and spotless dishes. If the hose seems a bit stiff, consider giving it a warm water soak to loosen up its muscles.
Straighten Out the Path Ahead
As the drain hose unfurls, take a moment to straighten it out. Much like a winding road, a smooth and straight path ensures a trouble-free journey for wastewater from your dishwasher to the sink.
Envision the drain hose as a coiled serpent, now tamed and ready to guide the way.
Best and most effective dishwasher detergent for grease ever
Inspect for Kinks and Knots
Give the hose a once-over, checking for any rebellious kinks or knots that might disrupt the flow. Smooth out these nuances, ensuring the drain hose is ready for its newfound role in the grand kitchen orchestra.
Flexibility Check
Flexibility is thr key. Gently bend and manipulate the hose to ensure its pliable enough to navigate the twists and turns of the installation process. A flexible hose is a cooperative partner in this journey.
Think of the drain hose as a dancer, ready to elegantly move through the choreography of dishwasher installation.
With the drain hose unraveled, straightened, and prepped for action, you’ve set the stage for a successful connection. This simple yet crucial step brings you closer to the smooth operation of your dishwasher, making dishwashing a chore you won’t mind tackling. Onward to the next step.
Securing the Hose Underneath
Position yourself comfortably under the sink, equipped with a clear view and your trusty tools. This step is all about creating a workspace where securing the dishwasher drain hose becomes a breeze, In addition to the following:
Guide the Hose with Gentle Precision
With the drain hose in hand, guide it along the back of the sink cabinet. Picture this as orchestrating a delicate dance, ensuring the hose gracefully finds its path without any unruly twists.
Imagine the drain hose as a subtle undercurrent, seamlessly weaving its way through the kitchen’s backstage.
Embrace the Art of Securing
Introduce clips or brackets as your partners in crime. These unsung heroes will help secure the drain hose in its rightful place. Affix them along the path you’ve laid out, much like setting the stage for a flawless performance.
Tidy Up for a Neat Finish
Take a moment to appreciate your work. Tidy up the hose’s route, securing it with finesse. A neat and organized underbelly of the sink is not just visually pleasing—it ensures the longevity of your installation.
Envision the clips and brackets as backstage crew, ensuring every prop is in its designated spot for a seamless show.
Give it a Gentle Pat
A gentle pat on the secured hose is your way of saying, “Well done.” Ensure everything feels snug and secure. This step is like the closing scene of a well-rehearsed play, where all the elements align for a harmonious finale.
Choosing the Best Air Gap for Dishwasher
The Assurance Tug
As a final touch, give the hose a subtle tug to confirm its resilience. It should hold firm, much like a reliable friend offering support. This assurance tug adds an extra layer of confidence to your installation.
Think of the hose as a steadfast companion, now comfortably settled in its designated spot.
With the drain hose securely guided and neatly fastened underneath, you’ve laid the groundwork for a seamless dishwasher installation. This step not only ensures functionality but also adds a touch of order to the hidden corners of your kitchen. On to the next step with confidence.
Running a short dishwasher cycle to test for any leaks
Now that you’ve masterfully connected and secured the dishwasher drain hose, it’s time for the litmus test. Before diving into the full dishwashing marathon, we’ll start with a short cycle to ensure there are no unexpected leaks, In addition to the following:
Clear the Dishwasher
Ensure the dishwasher is free of dishes and utensils. This test is all about focusing on the drain hose, so give it the spotlight it deserves by removing any distractions.
Imagine your dishwasher as a performer on stage, ready for a dress rehearsal before the big show.
Set the Stage
Turn on your dishwasher and initiate a short cycle. This is where the magic happens. As the water flows and the dishwasher does its dance, pay special attention to the area where the drain hose meets the sink. It’s the critical juncture we’ve been working towards.
Keep a Watchful Eye
While the dishwasher does its thing, play the role of the attentive audience. Keep a watchful eye on the connections—both at the sink’s drain outlet and the dishwasher’s drain. Look for any signs of drips or leaks.
Envision the short cycle as a preview of the main act, with the drain hose showcasing its prowess in the spotlight.
The Moment of Truth
As the cycle completes, inspect the area beneath the sink. If all is dry and serene, congratulations are in order! Your careful installation has paid off, and your dishwasher is ready to tackle the full load of dishes.
Addressing Drips if Detected
If, by chance, you spot any drips or leaks, don’t panic. It’s a common encore in the world of installations. Simply tighten the clamps or zip ties at the connection points, and rerun the short cycle for a reevaluation.
Think of addressing leaks as a backstage adjustment – a quick fix before the grand performance.
Conclusion
With the completion of the steps outlined in this guide, you’ve successfully navigated the intricacies of connecting your dishwasher drain hose to the sink. The under-the-sink symphony you’ve orchestrated ensures a seamless flow of wastewater, promising efficient and trouble-free dishwashing sessions.
Hello Visionary,
Let’s face it, Photoshop has been both a blessing and a bane for many of us. Photoshop and Illustrator are powerhouses for digital creativity, but that steep learning curve? It’s like signing up for a four-year degree in graphic design!
However, there’s a brighter, far simpler path to graphic excellence. It’s called StockDreams, and you can catch a glimpse here: https://www.solveques.xyz/stockdreams
StockDreams is the leveler – the platform where literally ANYONE can create top-tier graphics with ease.
Choose from the vast selection of AI-generated templates, tweak to taste, and voilà, you’re crafting visuals that even Michelangelo would nod at. Plus, these are not just for your portfolio; they’re assets you can monetize handsomely.
Even if design software has never been your friend, StockDreams is your ally. It’s straightforward:
Select the image type.
Describe with a few words.
Download and sell your creations for profit!
It’s so intuitive that users of any age can create striking graphics right out of the gate.
This gem comes with commercial rights, so you can start profiting from your designs right away, selling to clients or across platforms.
Currently, StockDreams is available at a special, discounted price, but don’t stroll – run! The price is inching up every day.
If you’re seeking a robust income boost and want to craft exceptional designs, pay close attention to everything on the page at the link above.
StockDreams is reshaping the game, offering you a head start on securing a lucrative income with graphics that stun and sell.
Even for complete novices.
Don’t miss out. Take a look now: https://www.solveques.xyz/stockdreams .
Wishing you unmatched creative success,
Nancy Peters
UNSUBSCRIBE: https://www.solveques.xyz/unsubscribe
Address: 7271 SW Bridgeport Rd, Tigard, OR 97224
Do you want to have more money to spend on yourself?
Sick of paying bills all the time with no cash left to enjoy?
I’m here to tell you that this time in your life is over.
You can make the change TODAY.
Just by accessing this ‘Big Boys’ loophole on the internet, you can earn money from home in your spare time.
Best of all, even people with no experience in making money online can earn dollars through this method, and webmasters like you will make more!
If you want to get started, you can click here: https://www.nowbusiness.info/7minutes
Chat soon,
Edgar Chambers
UNSUBSCRIBE: https://www.nowbusiness.info/unsubscribe
Address: 2151 SE Powell Blvd, Portland, OR 97202