Why Pipe Cleaner Snowflakes?
Ever looked outside on a frosty morning, saw those delicate snowflakes on the window, and thought—wow, I wish I could make something that pretty indoors? Well, guess what—you totally can! Pipe cleaner snowflakes are the crafty cousin of the real deal. They’re sparkly, fun to make, and the best part? They don’t melt on you halfway through December.
Whether you’re looking for a holiday decoration, a rainy-day kids’ project, or just a little sparkle for your home, this is one of those crafts that’s budget-friendly, simple, and surprisingly therapeutic. Imagine sipping hot cocoa, a tray of shiny beads nearby, and a table full of pipe cleaners waiting to turn into little bursts of winter magic. Sounds cozy, right?
But how exactly do you make them? Don’t worry—we’ll walk through it step by step, with plenty of little tips to make your snowflakes look fabulous.
The Crafting Toolbox
Before we dive into folding and twisting, let’s talk supplies. You won’t need anything fancy—most of these items are probably already hanging around in your craft drawer (or that one messy “random stuff” drawer everyone has).
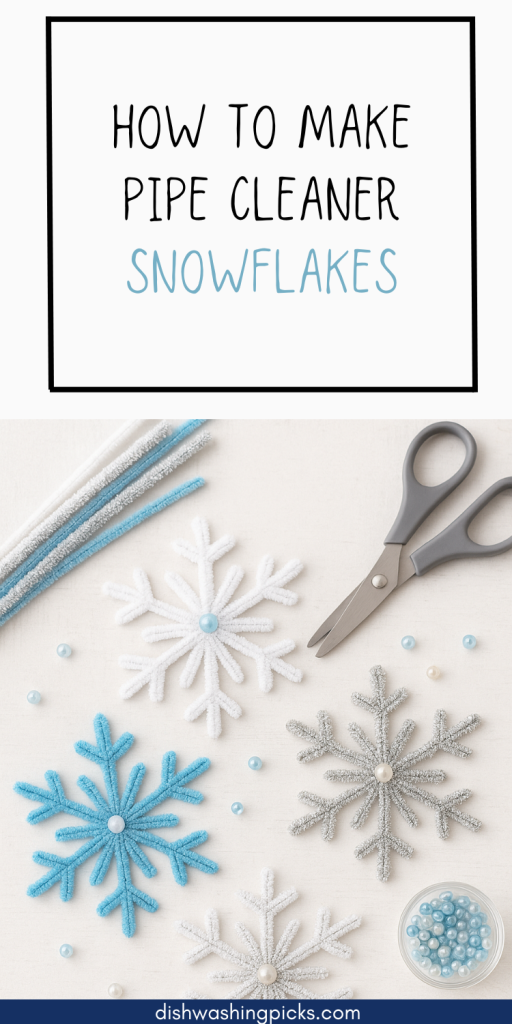
- Pipe cleaners (white, silver, or sparkly blue look amazing for snowflakes)
- Scissors (to trim down the ends)
- Beads (optional, but they take your snowflakes from cute to wow)
- Glue or thread (if you plan to hang them up)
See? Nothing overwhelming. And honestly, half the fun is mixing colors. Want a neon pink snowflake? Go for it. Who said winter has to be all about icy blues?
So, once we’ve got our toolkit ready, let’s actually make these things.
Making Your Snowflakes
Okay, picture this—you’re about to turn a fuzzy pipe cleaner into a symmetrical little piece of art. Here’s how to do it without overthinking:
- Start with three pipe cleaners.
Lay them across each other in a star or “+” shape. Twist them in the center so they hold together. Boom—you’ve got the base of your snowflake. - Shape the arms.
Each pipe cleaner sticking out is an “arm” of your snowflake. You can leave them as is, or bend them slightly to give a more natural look. - Add details.
Want to make it fancy? Twist smaller pieces of pipe cleaners around the arms to create branches, just like a real snowflake. This is where you can get creative—no two need to look the same (just like nature intended!). - Decorate.
Slide beads onto the ends, or wrap the arms with a different colored pipe cleaner for contrast. Little touches like that make your snowflakes stand out. - Finishing touches.
Trim any uneven bits, add a dab of glue if beads slip, and tie a piece of thread on top if you plan to hang it up.
And there you have it—a snowflake you made with your own two hands. Pretty cool, right?
Creative Ideas to Use Them
Now that you’ve made one (or five… these things get addictive), what do you do with them? Here are a few ideas to get your imagination rolling:
- Hang them in windows so the light bounces off the beads.
- Use them as DIY Christmas tree ornaments.
- String several together for a snowflake garland.
- Add one to a wrapped gift for an extra personal touch.
- Let kids make their own and turn it into a “snowstorm” wall display.
The possibilities are endless—and the best part is, these little snowflakes never go out of season.
Your Own Little Winter Wonderland
So, there you have it—a simple, creative, and surprisingly relaxing way to bring winter indoors. Pipe cleaner snowflakes are one of those crafts where the process is just as enjoyable as the final result. You twist, you decorate, you hang them up, and suddenly your home feels like a cozy snow globe.
And here’s a challenge: try making a set of snowflakes in different styles and colors, then hang them all together. You’ll be amazed at how much personality each one brings.
After all, isn’t that the magic of snowflakes? No two are ever the same—just like your handmade creations.